
9 min read
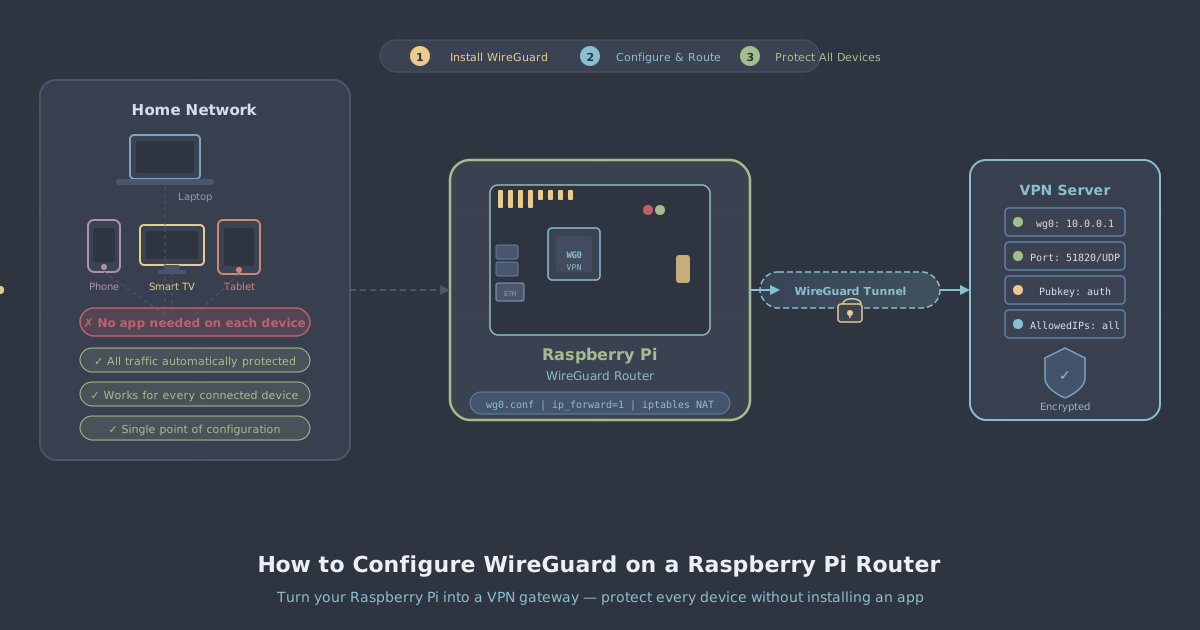
Most VPN guides assume you want to protect one device at a time. Install an app, connect, done. That works well enough for a laptop or phone, but it falls apart the moment you want to cover a smart TV, a games console, or a handful of IoT devices that have no app support whatsoever. A VPN router solves this cleanly: one WireGuard tunnel covers everything connected to your network.
A Raspberry Pi is a practical choice for this job. It is inexpensive, runs a full Linux distribution, consumes very little power, and handles WireGuard comfortably—WireGuard's lean kernel-level implementation means even a Pi 4 can push several hundred megabits per second through an encrypted tunnel. This guide walks you through the complete setup, from a fresh Raspberry Pi OS installation to a functioning VPN router that routes all client traffic through PremierVPN.
This guide assumes you are comfortable with the Linux command line and have basic familiarity with networking concepts such as IP addressing, NAT, and network interfaces. If you are new to VPNs in general, the what is a VPN explainer is a good starting point before you continue here.
What You Will Need
- A Raspberry Pi 4 (recommended) or Pi 3B+—the Pi 4 is preferred for throughput
- A microSD card with Raspberry Pi OS Lite (64-bit) installed
- An Ethernet connection to your existing router (the Pi's upstream internet source)
- A second network interface for the LAN side—either a USB Ethernet adapter or the Pi's built-in Wi-Fi acting as an access point
- A PremierVPN account with access to your WireGuard configuration file
- SSH access or a keyboard and monitor attached to the Pi
The network topology is straightforward. Your existing router connects to the internet as normal. The Pi sits between that router and your devices: its eth0 interface faces upstream, and a second interface (wlan0 or a USB adapter) faces your local devices. All traffic from the local side is routed through a WireGuard tunnel on eth0.
Step 1: Prepare the Raspberry Pi
Start from a fresh Raspberry Pi OS Lite installation. After booting and logging in, update the package list and upgrade installed packages:
sudo apt update && sudo apt upgrade -ySet a static IP address on eth0 so the Pi's upstream address does not change. Edit the DHCP client configuration:
sudo nano /etc/dhcpcd.confAdd the following at the end of the file, adjusting the IP range to match your existing router's subnet:
interface eth0
static ip_address=192.168.1.2/24
static routers=192.168.1.1
static domain_name_servers=1.1.1.1 8.8.8.8
Save and close the file, then reboot:
sudo rebootStep 2: Install WireGuard
WireGuard is included in the mainline Linux kernel since version 5.6, and Raspberry Pi OS ships a kernel recent enough to support it. Installing the userspace tools is all that is required:
sudo apt install wireguard wireguard-tools -yConfirm the installation succeeded:
wg --versionYou should see a version string printed. If the command is not found, check that your OS image is up to date and retry the install step.
Step 3: Add Your PremierVPN WireGuard Configuration
Log into your PremierVPN account and download the WireGuard configuration file for the server location you want to use. You can review available locations on the server locations page. The file will have a .conf extension and contain your private key, the server's public key, endpoint address, and allowed IP ranges.
Copy the configuration file to your Pi—via scp from another machine, or paste its contents directly. Place it in WireGuard's configuration directory:
sudo nano /etc/wireguard/wg0.confPaste the contents of your downloaded configuration file. A typical PremierVPN WireGuard config looks like this (values are illustrative):
[Interface]
PrivateKey = YOUR_PRIVATE_KEY_HERE
Address = 10.8.0.2/32
DNS = 1.1.1.1

[Peer]
PublicKey = SERVER_PUBLIC_KEY_HERE
Endpoint = vpn.example.premiervpn.com:51820
AllowedIPs = 0.0.0.0/0, ::/0
PersistentKeepalive = 25
The AllowedIPs = 0.0.0.0/0 line is what makes this a full-tunnel configuration—all traffic from the Pi will be routed through the VPN. Save and close the file, then restrict its permissions so no other user can read your private key:
sudo chmod 600 /etc/wireguard/wg0.confStep 4: Enable IP Forwarding and Configure NAT
For the Pi to act as a router, it must forward packets between its interfaces. Enable IP forwarding permanently by editing the kernel parameters file:
sudo nano /etc/sysctl.confFind the line #net.ipv4.ip_forward=1, uncomment it by removing the hash, and save. Apply the change immediately without rebooting:
sudo sysctl -pNext, configure NAT using iptables so that traffic from your local devices is masqueraded as coming from the Pi. Replace wg0 with your WireGuard interface name if you used a different one:
sudo iptables -t nat -A POSTROUTING -o wg0 -j MASQUERADE
sudo iptables -A FORWARD -i wlan0 -o wg0 -j ACCEPT
sudo iptables -A FORWARD -i wg0 -o wlan0 -m state --state RELATED,ESTABLISHED -j ACCEPT
If your LAN-facing interface is a USB Ethernet adapter rather than wlan0, substitute its interface name (typically eth1) throughout.
Make these rules persistent across reboots by installing iptables-persistent:
sudo apt install iptables-persistent -y
sudo netfilter-persistent save
Step 5: Bring Up the WireGuard Interface
Start the WireGuard tunnel and enable it to start automatically on boot:
sudo systemctl enable wg-quick@wg0
sudo systemctl start wg-quick@wg0
Check the tunnel status to confirm it has connected:
sudo wg showYou should see your interface listed with the peer's public key, the endpoint address, and—after a moment—a latest handshake timestamp. If the handshake is absent after 30 seconds, double-check the endpoint address and your private key in wg0.conf.
Step 6: Configure the LAN-Facing Interface
If you are using the Pi's built-in Wi-Fi as an access point, you will need hostapd to broadcast a wireless network and dnsmasq to hand out IP addresses to clients. Install both:
sudo apt install hostapd dnsmasq -yAssign a static IP to wlan0 by adding a stanza to /etc/dhcpcd.conf:
interface wlan0
static ip_address=192.168.50.1/24
nohook wpa_supplicant
Configure dnsmasq to serve DHCP addresses to Wi-Fi clients. Back up the default config and create a new one:
sudo mv /etc/dnsmasq.conf /etc/dnsmasq.conf.bak
sudo nano /etc/dnsmasq.conf
interface=wlan0
dhcp-range=192.168.50.10,192.168.50.200,255.255.255.0,24h
domain=local
address=/gw.local/192.168.50.1Configure hostapd to create the wireless access point:
sudo nano /etc/hostapd/hostapd.confinterface=wlan0
driver=nl80211
ssid=PiVPN
hw_mode=g
channel=7
wmm_enabled=0
macaddr_acl=0
auth_algs=1
ignore_broadcast_ssid=0
wpa=2
wpa_passphrase=YourStrongPassphraseHere
wpa_key_mgmt=WPA-PSK
wpa_pairwise=TKIP
rsn_pairwise=CCMPPoint hostapd at this config file by editing /etc/default/hostapd and setting:
DAEMON_CONF="/etc/hostapd/hostapd.conf"Enable and start both services:
sudo systemctl unmask hostapd
sudo systemctl enable hostapd dnsmasq
sudo systemctl start hostapd dnsmasq
Step 7: Verify the Setup
Connect a device to your new Wi-Fi network (SSID: PiVPN in the example above). Once it obtains an address in the 192.168.50.x range, confirm the tunnel is working:
- Visit the PremierVPN IP leak test from the connected device—your public IP should show as the VPN server's address, not your home broadband IP.
- Check for DNS leaks on the same page. All DNS queries should resolve through the VPN tunnel rather than your ISP's resolvers.
- Run
sudo wg showon the Pi and confirm thetransfercounters are increasing as you browse, which means traffic is flowing through the tunnel.
If the public IP is still your home address, the most common cause is the iptables MASQUERADE rule targeting the wrong interface. Verify with sudo iptables -t nat -L -v and confirm the rule references wg0.
Keeping the Setup Resilient
A VPN router is only reliable if the tunnel stays up and traffic does not leak when it drops. A few additional hardening steps are worth applying.
Block traffic if the tunnel goes down
Add a rule that drops forwarded traffic from the LAN if it would exit via eth0 (cleartext) rather than wg0. This prevents a tunnel failure from silently exposing your devices to unencrypted internet traffic:
sudo iptables -I FORWARD -i wlan0 -o eth0 -j DROPSave rules again after any change:
sudo netfilter-persistent saveUse a watchdog script
A simple cron job can check whether the tunnel is alive and restart it if the handshake is stale. Create a script at /usr/local/bin/wg-watchdog.sh:
#!/bin/bash
LAST=$(sudo wg show wg0 latest-handshakes | awk '{print $2}')
NOW=$(date +%s)
DIFF=$((NOW - LAST))
if [ "$DIFF" -gt 180 ]; then
  systemctl restart wg-quick@wg0
fi
Make it executable and add it to cron:
sudo chmod +x /usr/local/bin/wg-watchdog.sh
sudo crontab -e
Add this line to run the check every two minutes:
*/2 * * * * /usr/local/bin/wg-watchdog.shSummary
At this point you have a Raspberry Pi acting as a dedicated WireGuard VPN router. Every device that connects to it—phone, tablet, smart TV, games console, or anything else—has its traffic automatically routed through your PremierVPN tunnel without needing its own app or configuration. The kill-switch iptables rule means a tunnel failure will interrupt connectivity rather than silently expose traffic, and the watchdog script keeps the tunnel healthy under normal conditions.
If you need a server location optimised for specific use cases—lower latency for gaming, or a location suited to streaming—the server locations page lists all available options with regional groupings. For households that want the same protection without the DIY router project, a dedicated WireGuard server gives you a private WireGuard endpoint you can point a supported router firmware at directly, with no shared infrastructure.