7 min read
You connect to a café Wi-Fi, open your VPN app, wait for the green tick, and assume everything is private from that point on. For most people, that assumption holds. But there is one specific failure mode that can silently undo your VPN's privacy protection without triggering any warning: a DNS leak.
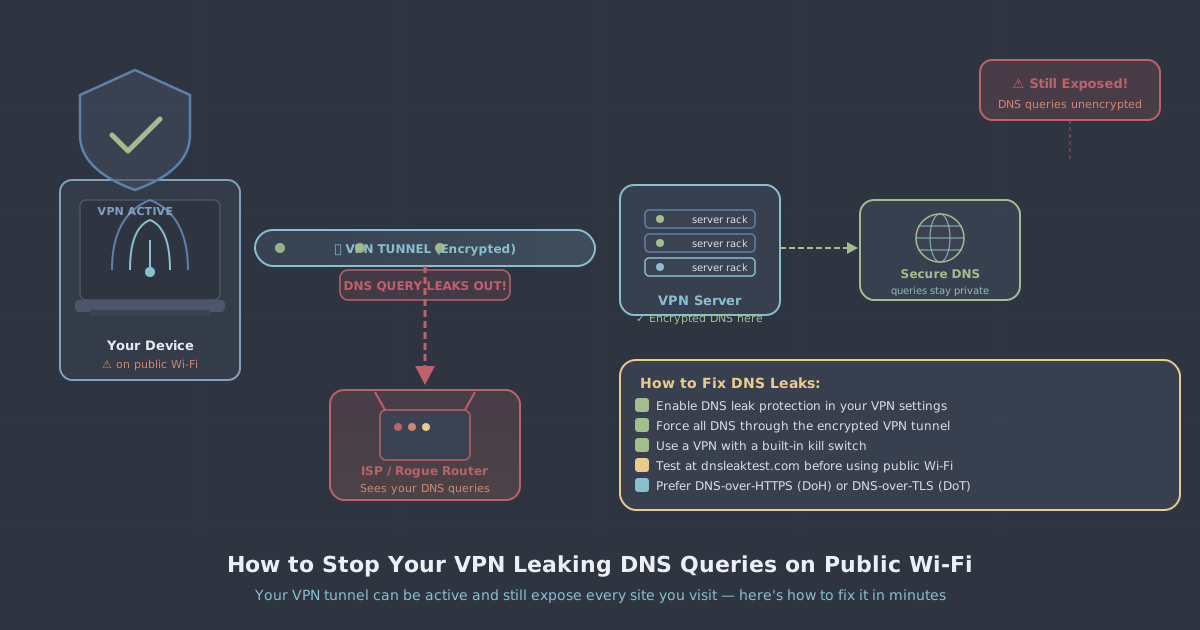
A DNS leak means your device is sending domain-name queries outside the encrypted tunnel—typically to the router's DNS server, your ISP's resolver, or a public DNS service configured before you connected. The VPN encrypts your actual traffic, but the DNS requests that reveal which sites you're visiting travel in the open. On a public Wi-Fi network, that is a meaningful exposure.
This guide explains exactly why DNS leaks happen, how to confirm whether you have one right now, and the concrete steps to close the gap. The whole process takes under ten minutes.
What DNS Queries Actually Reveal
Every time you type a URL into a browser, your device asks a DNS resolver to translate that hostname into an IP address. That query leaves your device before the page loads—and it contains the domain name in plain text.
If those queries bypass the VPN tunnel, anyone monitoring the network can see a timestamped list of every domain you visited: the news sites, the bank, the health forum, the work tools. They cannot see the content of those pages (assuming HTTPS), but the domain list alone is revealing. On public Wi-Fi, the operator of the access point, and anyone running a passive monitoring tool on that network, can capture this data trivially.
Why Leaks Happen Even When the VPN Is Connected
The VPN tunnel handles IP traffic, but DNS is configured separately at the operating system level. Several common scenarios cause queries to slip out:
- OS-level DNS not overridden. Windows, macOS, iOS, and Android each have their own DNS resolution stack. If the VPN app does not explicitly push DNS settings to the OS, the device keeps using whatever DNS server was assigned by the Wi-Fi router—usually the ISP's resolver.
- Split tunnelling set too broadly. Split tunnelling is useful, but if you have configured it to exclude system services or certain apps, DNS traffic from those excluded paths can leak outside the tunnel.
- IPv6 DNS without IPv6 tunnel support. Many VPNs only tunnel IPv4. If your device uses an IPv6 DNS resolver for IPv6 queries, those requests go out unprotected. This is sometimes called an IPv6 leak, but the DNS component of it is equally damaging.
- Reconnection gaps. When a VPN connection drops and reconnects, there is a brief window where the OS reverts to its default DNS. Without a kill switch, queries made during that gap go out in the clear.
- WebRTC in browsers. Some browsers use WebRTC for real-time communication features, and WebRTC can make DNS-adjacent requests that bypass VPN routing. This is a browser-level issue rather than a VPN configuration issue, but it compounds the risk.
How to Test for a DNS Leak Right Now
Testing is straightforward. PremierVPN provides a dedicated tool for this: visit our IP and DNS leak test while your VPN is connected. The page shows which DNS resolvers your device is actually using to resolve queries.
What you are looking for:
- Connect to the VPN and wait for the connection to be confirmed.
- Open the leak test page in your browser.
- Check the DNS servers listed. They should belong to PremierVPN's infrastructure—not to your ISP, your home router, Google (
8.8.8.8), Cloudflare (1.1.1.1), or any other third party. - If you see your ISP's name or any resolver you did not configure through the VPN, you have a DNS leak.
Run the test twice: once immediately after connecting, and once after deliberately letting the VPN idle for a few minutes. Some leaks only appear after the initial handshake settles.
Fixing DNS Leaks: Settings to Check
Enable DNS leak protection in the VPN app
The PremierVPN apps for Windows and macOS include built-in DNS leak protection. Open the app settings and confirm that DNS leak protection is enabled. When active, the app forces all DNS queries through PremierVPN's own resolvers inside the tunnel, regardless of what the OS has configured.
Enable the kill switch
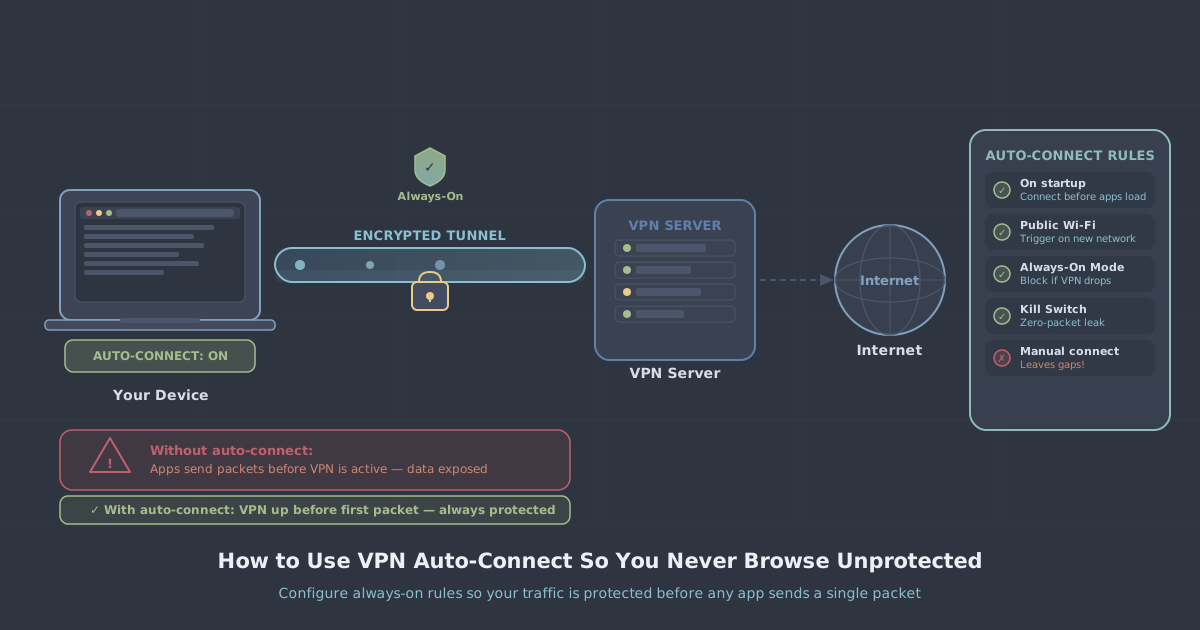
A kill switch blocks all internet traffic if the VPN connection drops unexpectedly. Without it, a brief reconnection gap sends DNS queries through the default OS resolver. In the PremierVPN app, the kill switch is a toggle in the Security or Connection settings section. On public Wi-Fi especially, this should always be on.
Review your split tunnelling configuration
If you have set up split tunnelling to exclude certain apps or IP ranges, audit that configuration carefully. Any app excluded from the tunnel will use the OS default DNS. If you are unsure, disable split tunnelling entirely while on public Wi-Fi and re-enable it on trusted networks where the risk is lower.
Disable IPv6 if the tunnel does not carry it
If your VPN connection uses IPv4 only, IPv6 DNS queries will leak by default because there is no IPv6 tunnel to route them through. You can disable IPv6 at the OS level while the VPN is active:
On Windows:
Control Panel → Network and Internet → Network Connections
Right-click the active adapter → Properties
Uncheck "Internet Protocol Version 6 (TCP/IPv6)"
On macOS:
System Settings → Network → select the active interface → Details
TCP/IP tab → Configure IPv6 → set to "Link-local only"
This is a manual step and needs to be reversed if you need IPv6 for other purposes. Some users prefer to leave it off permanently on laptops they use on public networks.
Override DNS in your OS network settings
As an additional layer, you can manually set your DNS servers to PremierVPN's resolvers at the OS level so that even if the app's push mechanism fails, queries still go to a resolver you control. Check the PremierVPN support documentation for the correct resolver addresses for your account.
A Note on Browser Extensions and WebRTC
If you use Chrome or Firefox, WebRTC can expose your local IP address and, in some configurations, affect DNS behaviour. The PremierVPN Protect browser extension addresses this at the browser level, blocking WebRTC leaks without requiring you to dig into browser flags. It works alongside the VPN app rather than replacing it—think of it as closing a gap that the tunnel alone cannot reach.
Public Wi-Fi Habits That Reduce Exposure
Configuration fixes are the primary defence, but a few habits make the remaining risk smaller:
- Connect the VPN before you open any browser tab or app. DNS queries happen the moment an app tries to reach the internet, not when you consciously start browsing.
- On mobile, use the iOS or Android app with the "Always On VPN" setting enabled in the OS. This forces the device to route all traffic through the VPN from the moment a network is available, with no manual intervention needed.
- Avoid networks that force a captive portal login while the VPN is active—you will need to disconnect briefly to authenticate, and during that window DNS is exposed. Authenticate first, then connect the VPN.
- If you travel frequently and rely on public networks, a Dedicated VPN Server gives you a fixed endpoint you control completely, which simplifies DNS configuration and eliminates shared-infrastructure variables.
Summary
A VPN connection and DNS privacy are not the same thing. The tunnel protects your traffic, but DNS queries require their own protection—and the default OS and router behaviour actively works against you on public Wi-Fi.
The fix is not complicated: enable DNS leak protection and the kill switch in your VPN app, audit split tunnelling, disable IPv6 if necessary, and run the leak test to confirm the result. Ten minutes of checking now closes a gap that would otherwise follow you across every café, airport, and hotel network you connect to.
If you want the full picture on what a VPN does and does not protect, our introduction to VPNs covers the fundamentals without the jargon.