8 min read
A Synology NAS sits at the heart of a lot of home and small-business networks. It handles backups, media streaming, file sharing, surveillance recordings, and—if you have remote access enabled—it's reachable from the internet around the clock. That makes it worth thinking carefully about what traffic leaves the device in plaintext and where it goes.
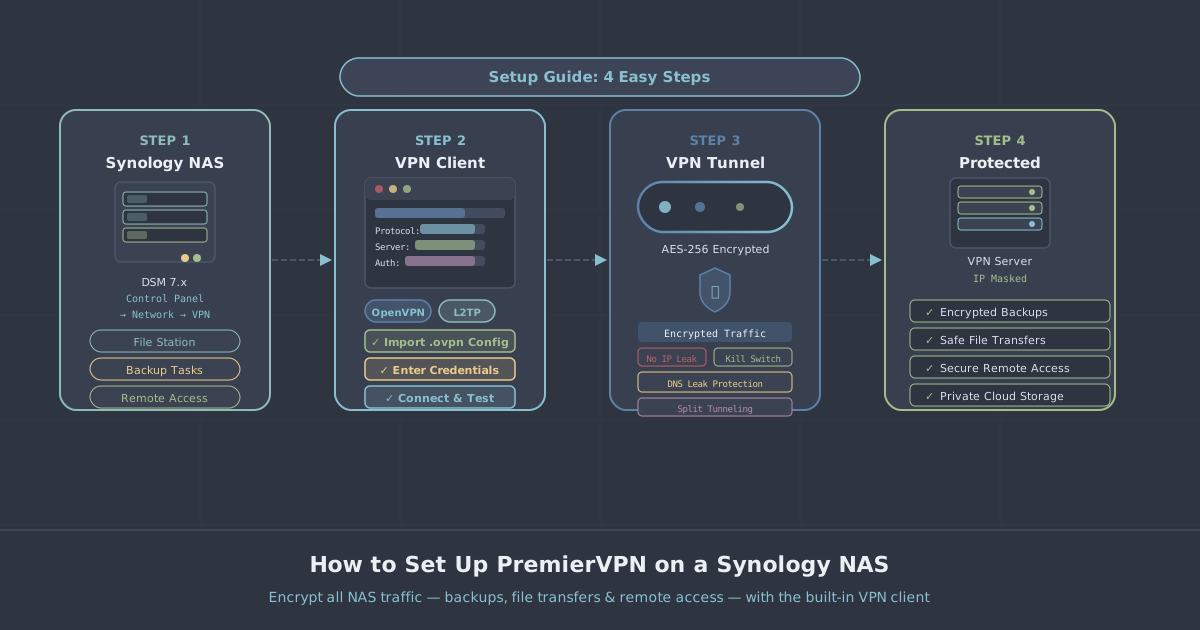
Routing your NAS through a VPN tunnel means that cloud backups, off-site sync tasks, and any outbound connections are encrypted before they leave your network. It also means that traffic appears to originate from your chosen VPN server location rather than your home IP. This guide walks you through connecting a Synology DiskStation to PremierVPN using the built-in VPN client in DiskStation Manager (DSM).
Synology's VPN client supports OpenVPN and L2TP/IPsec natively. WireGuard support on DSM is handled differently—we'll cover both approaches. If you're new to what a VPN actually does at a network level, our plain-English VPN explainer is a good starting point before diving in here.
What you'll need before you start
Before touching any settings, make sure you have the following ready:
- A Synology NAS running DSM 7.0 or later (the screenshots and menu paths in this guide reflect DSM 7)
- An active PremierVPN account with credentials to hand
- Administrator access to DSM
- The OpenVPN configuration file (
.ovpn) for your chosen server—downloadable from your PremierVPN account dashboard - Roughly 20 minutes
If you want to know which server location to connect to, visit the PremierVPN server locations page for the full list. For most use cases, pick the location geographically closest to you to keep latency low.
Installing the VPN Client package
Synology's VPN client is a separate package that may not be installed by default.
- Open DSM in your browser and log in as an administrator.
- Open Package Centre from the main menu.
- Search for VPN Client.
- Click Install. Once complete, the package appears in your main application list.
If VPN Client is already installed, skip ahead to the next section.
Connecting via OpenVPN
OpenVPN is the most straightforward method because Synology's VPN Client has native support for it, and PremierVPN supplies ready-made .ovpn configuration files.
Download your configuration file
- Log in to your PremierVPN account dashboard.
- Navigate to the Downloads or Manual Setup section.
- Download the OpenVPN
.ovpnfile for the server you want to use. Keep it somewhere accessible—you'll be uploading it to DSM in the next step.
Add the VPN profile in DSM
- Open VPN Client from the DSM application list.
- Click Add, then choose OpenVPN (via importing a .ovpn file).
- Give the profile a recognisable name, such as
PremierVPN - London. - Click Browse and select the
.ovpnfile you downloaded. - Enter your PremierVPN username and password in the fields provided.
- Click Next, review the summary, then click Apply.
Connect and verify
- Select your new profile in VPN Client and click Connect.
- The status indicator should change to Connected within 10–30 seconds.
- To confirm traffic is routing correctly, open a terminal session on the NAS via SSH and run:
curl ifconfig.meThe returned IP address should match the PremierVPN server you connected to, not your home IP. You can cross-check using our IP leak test tool.
Connecting via WireGuard
WireGuard offers notably lower overhead than OpenVPN, which matters on NAS hardware where CPU headroom is limited. DSM 7.2 introduced experimental WireGuard support through the VPN Client package, though availability depends on your specific NAS model and kernel version. Check whether your model supports it before proceeding.
Obtain your WireGuard configuration
- Log in to your PremierVPN account dashboard.
- Navigate to Manual Setup and select WireGuard.
- Generate or download the WireGuard configuration file (
.conf) for your chosen server.
Import the WireGuard profile
- Open VPN Client in DSM.
- Click Add and choose WireGuard.
- Select Import Configuration File and upload your
.conffile. - Name the profile and click Apply.
- Click Connect and wait for the status to show Connected.
If the WireGuard option isn't visible in your VPN Client, your NAS model's kernel doesn't include the WireGuard module. In that case, OpenVPN is the reliable fallback.
Routing specific traffic through the VPN
By default, once connected, the VPN profile may or may not route all outbound traffic from the NAS—this depends on the DSM version and whether the imported config includes a default gateway directive.
In your VPN Client profile settings, look for the option labelled Use VPN as default gateway. Enabling this sends all outbound NAS traffic through the tunnel. If you only want specific tasks (such as cloud backup sync) to use the VPN while keeping local LAN access unrestricted, leave this off and configure routing rules manually via DSM's network settings—though for most home users, using the VPN as the default gateway is the simpler and more secure choice.
Automatically reconnecting after a reboot
A NAS often reboots after package updates or power interruptions. By default, the VPN connection does not persist across reboots. To fix this:
- Open VPN Client and select your profile.
- Click Edit.
- Enable the option Reconnect when the VPN connection is lost and, if available, Connect on DiskStation startup.
- Save the profile.
With both options enabled, the NAS will re-establish the VPN tunnel automatically whenever it starts up or if the connection drops mid-session.
Practical considerations for NAS use
Performance on low-power hardware
Older or entry-level Synology models have modest CPUs. OpenVPN is CPU-intensive and can cap your effective transfer speed well below your connection's theoretical maximum. WireGuard is considerably lighter. If you're on a capable model (anything with an Intel Celeron or above, or a recent Realtek/ARM chip with hardware AES acceleration), OpenVPN overhead is usually manageable. If you notice sluggish backup speeds after enabling the VPN, switching to WireGuard—where supported—is worth trying first before anything else.
Split tunnelling and LAN access
When Use VPN as default gateway is enabled, your NAS routes all traffic through the tunnel. Local LAN devices can still reach the NAS directly because LAN traffic doesn't leave the router; it stays on your internal network. What changes is outbound internet traffic from the NAS itself—cloud sync, package updates, external connections—all of which now exit through PremierVPN.
No-logs policy
PremierVPN operates a strict no-logs policy—connection times, IP addresses, and traffic are not recorded. For a device that may be syncing sensitive business documents or personal backups offsite, this is worth confirming before you route traffic through any VPN provider.
Dedicated IP for consistent remote access
If you use Synology's QuickConnect or port-forwarded access and want a stable IP address for firewall allowlisting, PremierVPN's Dedicated IP option gives you a fixed address that doesn't change between sessions. This is particularly useful if your NAS is used in a business context where external partners need consistent access to a known IP.
Troubleshooting common issues
| Symptom | Likely cause | Fix |
|---|---|---|
| Connection fails immediately | Wrong credentials or corrupted .ovpn file |
Re-download the config file and re-enter credentials carefully |
| Connects but IP address unchanged | Use VPN as default gateway is disabled | Enable this option in the profile settings |
| VPN drops after a few minutes | Keepalive not set in config | Contact PremierVPN support to get a config with keepalive directives |
| Slow backup speeds | OpenVPN CPU overhead | Switch to WireGuard if your model supports it |
| WireGuard option not visible | Kernel module not available on this model | Use OpenVPN instead |
Summary
Setting up PremierVPN on a Synology NAS is straightforward once you have the right configuration file and understand which options to toggle. For most users, the OpenVPN route is the path of least resistance: download the .ovpn file, import it into VPN Client, enter your credentials, enable the VPN as default gateway, and turn on automatic reconnection. If your NAS model supports WireGuard under DSM 7.2 or later, that's worth trying for the performance benefit.
Once connected, every outbound connection your NAS makes—whether that's a Hyper Backup job syncing to an off-site destination, a Cloud Sync task pushing to external storage, or a package downloading an update—travels through an encrypted tunnel. For a device that often holds some of your most important data, that's a reasonable baseline to maintain.