8 min read
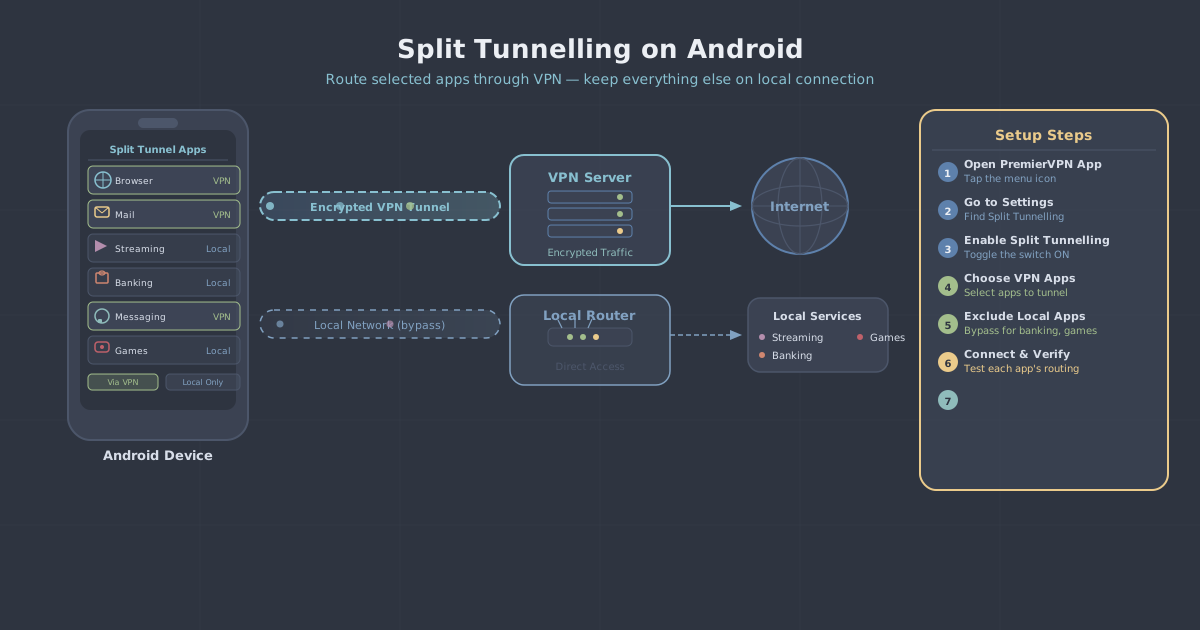
Split tunnelling lets you decide, on an app-by-app basis, which traffic travels through the VPN and which goes directly over your regular internet connection. On Android, PremierVPN builds this directly into the app—no rooting required, no third-party tools, no complicated workarounds.
This guide walks you through the exact steps to configure per-app routing on Android, explains the two modes available, and covers a handful of practical scenarios where fine-tuning your tunnel genuinely makes a difference to day-to-day use.
If you are new to VPNs altogether, it is worth reading our primer on what a VPN is before continuing. If you already know the basics, read on.
What Split Tunnelling Actually Does
When you connect to PremierVPN without any split tunnelling configured, all traffic from your Android device—every app, every background service—is routed through the encrypted tunnel to the VPN server. That is the default, and it is the right choice for many situations.
Split tunnelling changes that. You can tell the app to send only specific apps through the VPN, or alternatively to send everything except specific apps through it. These are two distinct modes, and understanding the difference matters before you start ticking boxes.
- Include mode: Only apps you select travel through the VPN. Everything else uses your local connection directly.
- Exclude mode: All apps travel through the VPN except those you specifically exempt.
Neither mode is universally better. The right choice depends on what you are trying to achieve.
Before You Begin
Make sure you have the PremierVPN Android app installed and that you are signed in. If you have not set it up yet, follow the Android setup guide first—it takes only a few minutes.
You will also need to have accepted the VPN permission prompt that Android displays the first time you connect. This is a standard Android security step and simply means you are granting the app permission to manage a VPN connection on your device.
Split tunnelling works across all of PremierVPN's supported protocols on Android—WireGuard, WireGuard Stealth, OpenVPN, and VLESS+REALITY—so you do not need to change your protocol selection to use it.
Step-by-Step: Configuring Split Tunnelling
Step 1 — Open the app settings
Open the PremierVPN app on your Android device. Tap the Settings icon, usually found in the bottom navigation bar or accessible via the menu in the top corner, depending on your app version.
Step 2 — Find the Split Tunnelling option
Inside Settings, scroll until you see Split Tunnelling. Tap it to open the configuration screen. You will see the two mode options at the top—Include and Exclude—followed by the full list of installed apps on your device.
Step 3 — Choose your mode
Decide which approach fits your goal:
- If you only want a small number of apps to use the VPN (for example, a browser and a torrent client), choose Include and select those apps.
- If you want most apps to use the VPN but need to exempt one or two (for example, your banking app or a local streaming service), choose Exclude and select the exceptions.
In most cases, Exclude mode is more convenient because it means new apps you install are automatically covered by the VPN without you needing to update the list manually.
Step 4 — Select your apps
Scroll through the list and tap the toggle next to each app you want to include or exclude. The list shows all installed apps, including system apps if you scroll far enough. You can use the search bar at the top to find a specific app quickly rather than scrolling through a long list.
Your selections are saved automatically—there is no separate save button.
Step 5 — Connect and verify
Return to the main screen and connect to your chosen server. The split tunnelling configuration takes effect immediately once the VPN is active.
To verify it is working as expected, open one of the apps you have routed through the VPN and check your visible IP address using our IP leak test. Then open an excluded app and run the same check—you should see your real IP address there instead of the VPN server's address.
Practical Scenarios
Keeping local services accessible
If you use a network-attached storage device, a local printer app, or a smart home controller that only works on your home network, routing those apps outside the VPN tunnel means they continue to see your local network as normal. Add them to the Exclude list and they will behave as if the VPN is not running at all.
Banking apps
Some banking apps flag activity that appears to originate from a VPN server and may temporarily restrict access or trigger additional verification steps. Excluding your banking app from the tunnel sidesteps this without requiring you to disconnect the VPN entirely every time you check your balance.
Torrenting through the VPN while browsing locally
If you want your torrent client to always use the VPN but prefer your browser to use your direct connection for speed or to access geo-restricted local content, Include mode with just the torrent client selected is the cleaner approach. You get the privacy benefit where it matters most without routing everything through the tunnel.
Work apps on a remote connection
If you need your employer's apps to connect through a corporate network rather than the VPN, exclude them individually. Everything else—personal browsing, messaging, anything unrelated to work—stays inside the PremierVPN tunnel. This is a common requirement for people using PremierVPN alongside a workplace connection. Our remote work VPN page covers broader considerations for this kind of setup.
Things Worth Knowing
System apps and background services
Android runs a number of background services that do not appear in your app drawer—things like Google Play Services, software update daemons, and device telemetry. These are listed under split tunnelling settings if you enable the option to show system apps. Think carefully before exempting system apps from the VPN unless you have a specific reason, as some of them handle data you may want protected.
The kill switch and split tunnelling
PremierVPN includes a kill switch that blocks internet access if the VPN connection drops unexpectedly. When split tunnelling is active in Include mode, the kill switch protects only the apps you have selected—the others are already on your direct connection by design. In Exclude mode, the kill switch continues to protect all non-excluded apps. This is the expected behaviour, not a bug, but it is important to understand if your threat model requires that certain apps never send unencrypted traffic.
Protocol behaviour
Split tunnelling works consistently across WireGuard and OpenVPN on Android. If you are using VLESS+REALITY for access from a restrictive network environment, the same split tunnelling controls apply—useful if you need certain local apps to reach services on the local network while the rest of your traffic uses the obfuscated tunnel.
Resetting Your Split Tunnelling Configuration
If you want to go back to routing all traffic through the VPN, simply return to the Split Tunnelling screen in Settings and deselect all apps, or use the option to disable split tunnelling entirely if your app version provides that as a single toggle. The change takes effect the next time you connect, or immediately if you disconnect and reconnect.
Summary
Split tunnelling on Android with PremierVPN is straightforward once you understand the two modes. Use Exclude mode when you want broad VPN coverage with a few exceptions—it is easier to maintain as you install new apps. Use Include mode when you have a specific, limited set of apps you want routed through the VPN and you are happy for everything else to use your direct connection.
The steps are the same regardless of which Android device you are on: open Settings in the PremierVPN Android app, select your mode, pick your apps, and connect. Verify the result with an IP check, and adjust the list as your needs change. It takes five minutes to configure and saves you from having to toggle the VPN on and off throughout the day.